

First up, this post is a direct response to my previous posts on this summer’s talk about notarization. Notarization is a subject of much discussion, and there’s a lot happening out there. If you are looking for an exhaustive summary of notarization through many, many links, might I recommend this compilation post on Mr. Macintosh. If you are looking for the TL;DR, here it is: macOS 10.15 requires that software be notarized to pass the Gatekeeper checks. If it is not notarized, it will not pass these checks unless you can manipulate the System Policy Database to whitelist a Team’s certificate.
I didn’t do this alone, and I want to say a huge, huge thank you to everyone who helped me out as we tinkered through this somewhat opaque process.
In the Beginning, there was Gatekeeper and spctl
Before we go digging into how all of this works, you need to understand the importance of Gatekeeper in the process of reviewing the notarization of individual items. The spctl binary that is part of macOS’s command line interface, and has been for a very long time, are responsible for controlling what Gatekeeper looks at. These both write to a sqlite3 database stored at /var/db/SystemPolicy, and think of it a lot like a database of ID cards that the security guard at the desk will review. If your card is recognized, you pass through security without more than a passing hello at the barrier. If you card is not recognized, your ID is checked, your destination cleared, your name jotted down, and you’re granted a card if you belong.
This is how spctl whitelists applications for LaunchServices’ purposes.
This system can be directly manipulated via configuration profile, and those configuration profiles can be delivered by a capable MDM. Moreover, this has been the case since macOS 10.12. Hidden away in Apple’s documentation is the SystemPolicyRule payload type, which can allow you to embed whitelisted objects in an MDM Profile.
Anatomy of a SystemPolicyRule Payload
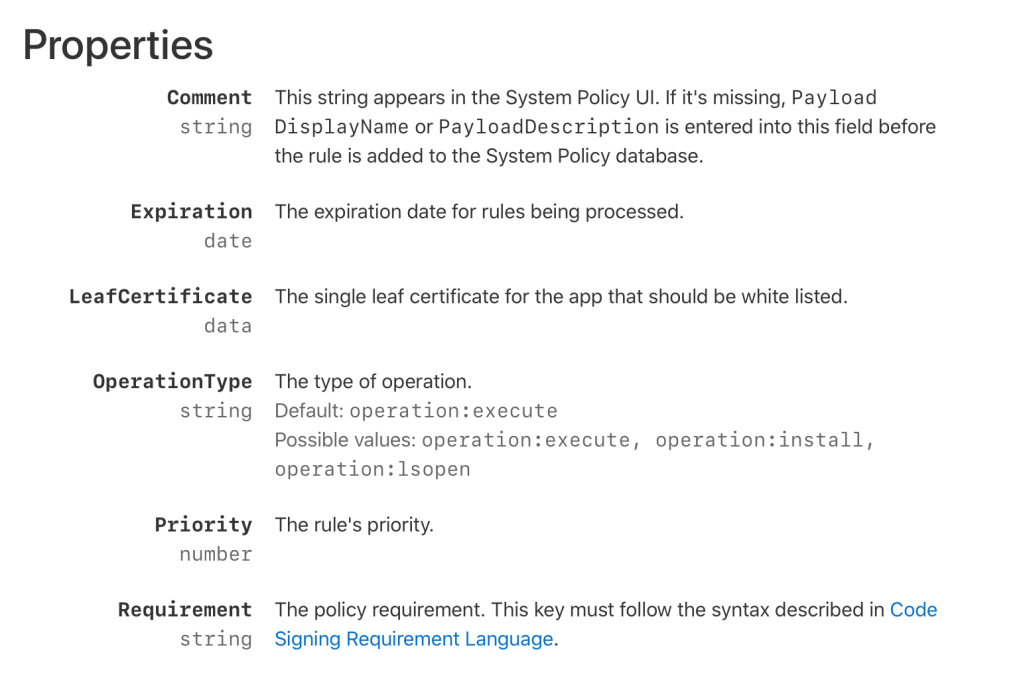
There are four interesting elements of the payload, and I’m going to take them in reverse order, from the bottom up:
Requirement is the policy requirement for the Code Signing information, and must match the syntax described by the CSRL. If you are familiar with writing PPPC policies in various tools, this will not be unfamiliar. The Requirement for our example profile is:
<key>Requirement</key>
<string>certificate leaf = $HASHCERT_DeveloperCertificate$</string>
In this case, the value of the string contains a reference to the hash of a specific certificate, here called DeveloperCertificate. We’ll come back to that certificate in a bit, but it corresponds to the signing certificate used by the developer to sign the package. Here, the $HASHCERT_ prefix is really a command to the MDM. It will derive a SHA hash value of the attached certificate and replace it in the string, so that the final value is then interpreted as:
certificate leaf = H"ca9284955c38aa337610c78e2bc1e532ef82ca2d"
Priority is the weighted value of the policy requirement for the payload. Rules can have varying priority level, and in our test profile, we’re using a Float value of 100.0.
Operation Type will tell you what kind of action you want govern. The operation type we care about for this example profile is an install. We want Gatekeeper to skip the notarization check during installation, so we’re going to add an OperationType of "operation:install"
LeafCertificate is the sticky point and that’s why I left it for last. You have to define the LeafCertificate of the signer. In our example profile that follows, the entirety of the public key of the signer’s certificate is embedded in the profile. This is going to require the most legwork, but there are shortcuts to get there. Flat packages in macOS have an XML Table of Contents, and you can use the xar command to extract it to a file where you can read it:
xar -t -f /path/to/your/package.pkg --dump-toc=toc.xmlYou can now read the toc.xml file in BBEdit or any other fine text editors to review the contents of the XML table of contents, which will contain the signing certificate required for what follows:

This leads us to the sample profile.
Sample Profile
<?xml version="1.0" encoding="UTF-8"?>
<!DOCTYPE plist PUBLIC "-//Apple//DTD PLIST 1.0//EN" "http://www.apple.com/DTDs/PropertyList-1.0.dtd">
<plist version="1.0">
<dict>
    <key>PayloadContent</key>
    <array>
        <dict>
            <key>PayloadDescription</key>
            <string>Configures Gatekeeper to accept developer certificate</string>
            <key>PayloadDisplayName</key>
            <string>System Policy Rule</string>
            <key>PayloadIdentifier</key>
            <string>com.apple.systempolicy.rule.1496C06B-32CC-4725-9648-D310B45D78AB</string>
            <key>PayloadType</key>
            <string>com.apple.systempolicy.rule</string>
            <key>PayloadUUID</key>
            <string>1496C06B-32CC-4725-9648-D310B45D78AB</string>
            <key>PayloadVersion</key>
            <integer>1</integer>
            <key>DeveloperCertificate</key>
            <data>MIIFcTCCBFmgAwIBAgIIBS/BS5wUWZUwDQYJKoZIhvcNAQELBQAweTEtMCsGA1UEAwwkRGV2ZWxvcGVyIElEIENlcnRpZmljYXRpb24gQXV0aG9yaXR5MSYwJAYDVQQLDB1BcHBsZSBDZXJ0aWZpY2F0aW9uIEF1dGhvcml0eTETMBEGA1UECgwKQXBwbGUgSW5jLjELMAkGA1UEBhMCVVMwHhcNMTcwNjI5MTE1MDM1WhcNMjIwNjMwMTE1MDM1WjCBkTEaMBgGCgmSJomT8ixkAQEMCjQ2SlE2NTM1ODgxOjA4BgNVBAMMMURldmVsb3BlciBJRCBJbnN0YWxsZXI6IERleXNvbiwgSW5jLiAoNDZKUTY1MzU4OCkxEzARBgNVBAsMCjQ2SlE2NTM1ODgxFTATBgNVBAoMDERleXNvbiwgSW5jLjELMAkGA1UEBhMCVVMwggEiMA0GCSqGSIb3DQEBAQUAA4IBDwAwggEKAoIBAQDJl9BeLVXpspNA+ZQV8PcJ1zs0m3UZ9kW0PWGoHIL7qF1ngNnrd4+Lj62+DgasoVhZumWEL+GooYOZDQiswdAkF1qG7EPKXYmO6sfLNSKhVruha80LS/PpegqDJNsOw+o2ns3tNj7TTZ5BpSuyQlkiAO4mo92v+Qfhvqu1vmQHJi4nVF1wIxg+LFchkQJIElReb6+g1Y0xOIbxC3JM+wIMfDDKd1sz22zhP6i/t+EGDWoEnTyOV1dmCNgQloQcgetJmODJCEsj9h1sa4+FpQmbHdYxSQIHwnIfYOPQjoc4FPl7Da8dW5XSuTvLIzzfIn5rdmARwk6mq+rXSCM2AvfhAgMBAAGjggHiMIIB3jA+BggrBgEFBQcBAQQyMDAwLgYIKwYBBQUHMAGGImh0dHA6Ly9vY3NwLmFwcGxlLmNvbS9vY3NwLWRldmlkMDIwHQYDVR0OBBYEFP8Ryi3QibMrmNCHi5WAEtFQW6LWMAwGA1UdEwEB/wQCMAAwHwYDVR0jBBgwFoAUVxftos/cfJihEOD8voctLPLjF1QwggEOBgNVHSAEggEFMIIBATCB/gYJKoZIhvdjZAUBMIHwMCgGCCsGAQUFBwIBFhxodHRwOi8vd3d3LmFwcGxlLmNvbS9hcHBsZWNhMIHDBggrBgEFBQcCAjCBtgyBs1JlbGlhbmNlIG9uIHRoaXMgY2VydGlmaWNhdGUgYnkgYW55IHBhcnR5IGFzc3VtZXMgYWNjZXB0YW5jZSBvZiB0aGUgdGhlbiBhcHBsaWNhYmxlIHN0YW5kYXJkIHRlcm1zIGFuZCBjb25kaXRpb25zIG9mIHVzZSwgY2VydGlmaWNhdGUgcG9saWN5IGFuZCBjZXJ0aWZpY2F0aW9uIHByYWN0aWNlIHN0YXRlbWVudHMuMA4GA1UdDwEB/wQEAwIHgDAXBgNVHSUBAf8EDTALBgkqhkiG92NkBA0wEwYKKoZIhvdjZAYBDgEB/wQCBQAwDQYJKoZIhvcNAQELBQADggEBABoQkblcJ67ogJCItUxk/TyScFgx5Ln3PJt1OwOTy4GqriL2T+bI+bxd206pcIjN0T7DMfvHLv0vsUQuENo5uPFHQGQeTo1WLd6Ys99MkjhqbLpVJLVch/AVRExXzFLkpnTWAk0l4ApVScSIRUswUeONhRY7Mc+7dFPoX2oOtsjwIR/98QnCykwBd01c4dhgg10BQ4bHAZjmHj8kXiI+yEJAT9YcuEw4PfSN6BgDViZVdsRLZD8z2UViyzYnwtbbKvCE2dx302SJ/ka+AVbnZdH8ZLAb09rgO+U6fdvDidiWtLf2Itehf21w0pnU9bRIe/IgqGFFJehhLDTP/O5+vmc=</data>
            <key>Requirement</key>
            <string>certificate leaf = $HASHCERT_DeveloperCertificate$</string>
            <key>OperationType</key>
            <string>operation:install</string>
            <key>Priority</key>
            <real>100.0</real>
            <key>Comment</key>
            <string>Test configuration 3 - OperationType: operation:install</string>
        </dict>
    </array>
    <key>PayloadDisplayName</key>
    <string>Gatekeeper Config</string>
    <key>PayloadIdentifier</key>
    <string>com.example.934CF679-5ABA-444C-BCE1-22BA582182AD</string>
    <key>PayloadOrganization</key>
    <string>Example</string>
    <key>PayloadScope</key>
    <string>System</string>
    <key>PayloadType</key>
    <string>Configuration</string>
    <key>PayloadUUID</key>
    <string>934CF679-5ABA-444C-BCE1-22BA582182AD</string>
    <key>PayloadVersion</key>
    <integer>1</integer>
</dict>
</plist>
I’ve tested this profile with SimpleMDM and a current macOS 10.15 Catalina system with a signed-but-not-notarized package that would fail to install otherwise, and I was no longer warned while trying to install this otherwise-quarantined package.
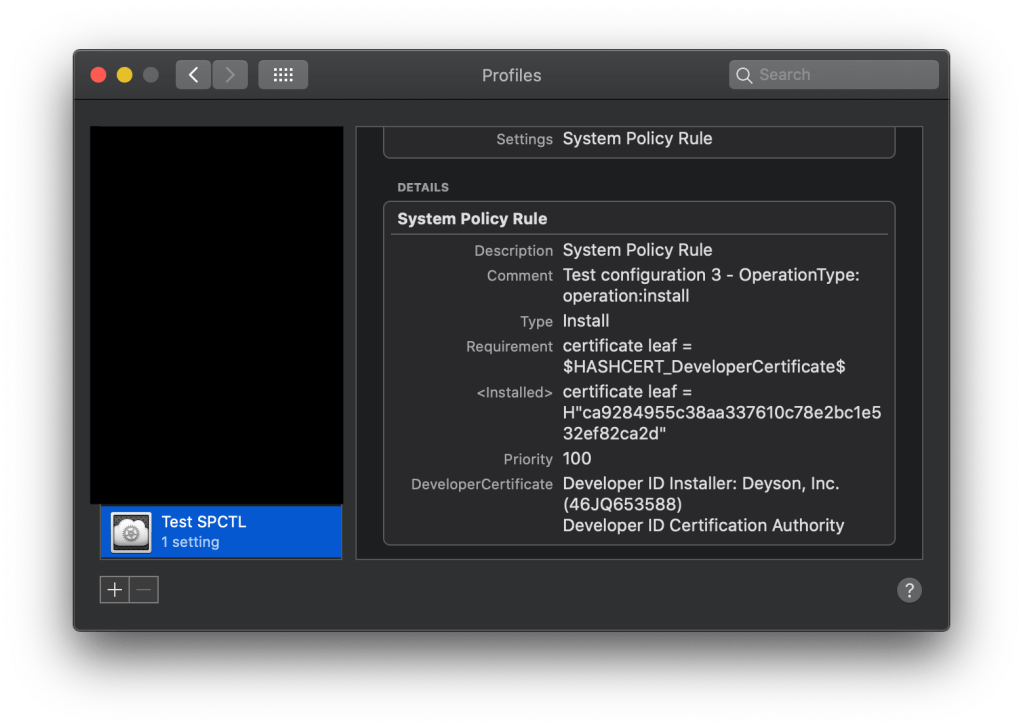
The profile was delivered via MDM and now shows a System Policy Rule with detail that matches our payload content. Now, keep in mind, the /var/db/SystemPolicy database only cares about the Requirement item, which is just a hex hash of the certificate. You can, if you choose, just include the hex hash in the Requirement item, but if you choose to do that, you will have to know what that hash represents. If you want to be kind to your users, which you should, you should include the Certificate itself, which will be decoded in the display to show you which signer and which certificate authority the certificate resolves against.
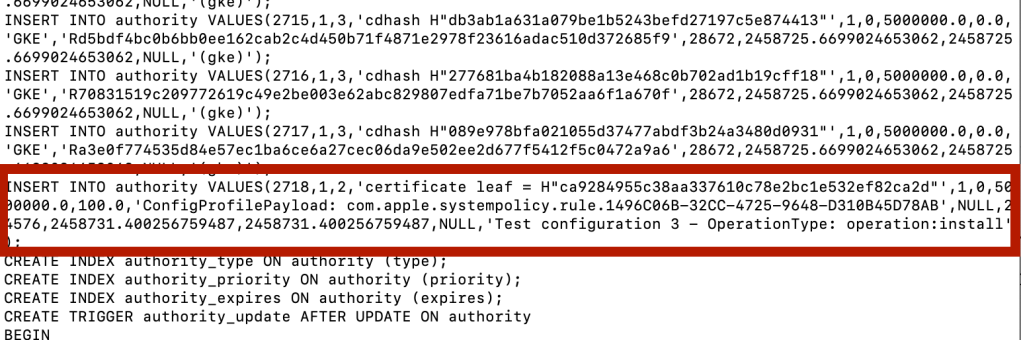
After the certificate is installed, you can check your work with a review of the /var/db/SystemPolicy sqlite3 database’s authority table. It should show a new entry that matched the newly whitelisted certificate:
This appears to be how you can whitelist individual signing certificates for notarization checks and distribute that whitelist to clients with a Mobile Device Manager using a payload that’s been around since macOS 10.12.
How Do I Do This For My Environment?
Start with a package that is signed, but not notarized. Using the xar command, extract the X509 Certificate of the package. You will need this for your profile.
Second, use uuidgen to create new UUIDs for the profile. You’ll need at least two. Replace the two UUIDs in your copy of the profile. UUIDs are paired in the PayloadIdentifier and PayloadUUID fields.
Customize your PayloadIdentifier and Comment fields with your organization and a description of the policy.
Postscript: Using This To Run Non-Notarized Applications
While all of the above is intended for the operation:install key, operation: execute would allow you to run non-notarized Applications without Gatekeeper dialogs for those applications that are downloaded in their entirety without an installer package. You will need a separate profile if you want to whitelist both an installer and an application.
